

How To Use Shopify with Kyozou
Kyozou is integrated with Shopify! To see how easy it is to setup your own Shopify store, fully integrated with our all-in-one ecommerce solution check out the guide below. Kyozou is designed as your full inventory, listing and order/shipping management solution. For more info on how you can setup on Shopify with a full ecommerce solution get in touch with us here.
Part One – Configuring Shopify
If you haven’t done so already, the first thing you need to do is create a Shopify account. You can do that here.
HOW TO SETUP SHOPIFY IN KYOZOU
- Log into your Shopify account to add Kyozou as a new private app. Go to Apps>>Manage private apps.

- Click on Manage Private Apps. You will be taken to a new screen to Create a new private app.
- Fill in your Private app name with the name of your Shopify store and the Emergency developer email with your Customer Success Manager email.
- Make sure your Admin API has Read and Write permissions for the 5 pieces of data below:
- Store content like articles, blogs, comments, pages, and redirects
- Customer details and customer groups
- Orders, transactions and fulfillments
- Products, variants and collections
- Inventory
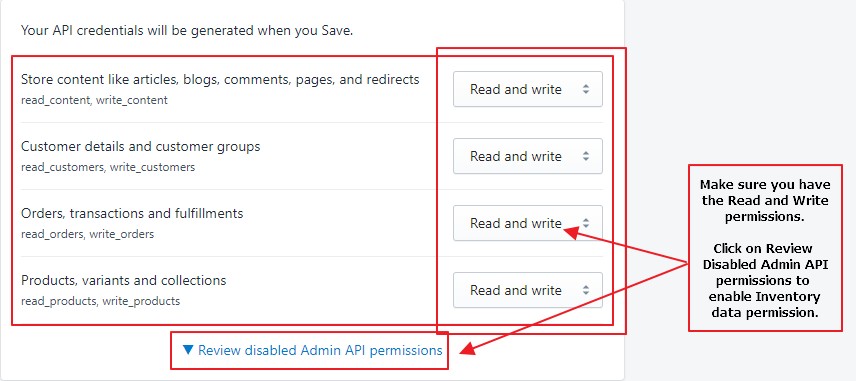
- Your API credentials, including API key, API Password, and API Shared Secret will be generated after you Save. You are now ready to configure your Shopify account with Kyozou.
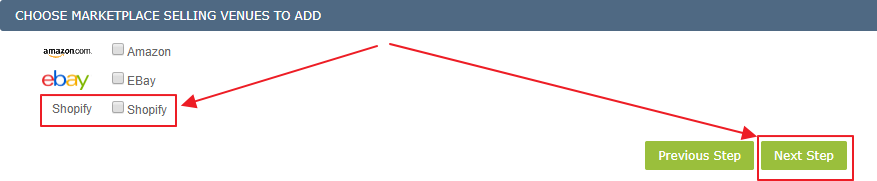
- Log into your Kyozou account and go to Administration>>Control Panel>>Step 11, where you will choose Shopify as a new Marketplace Selling Venue to Add. Then click Next Step.
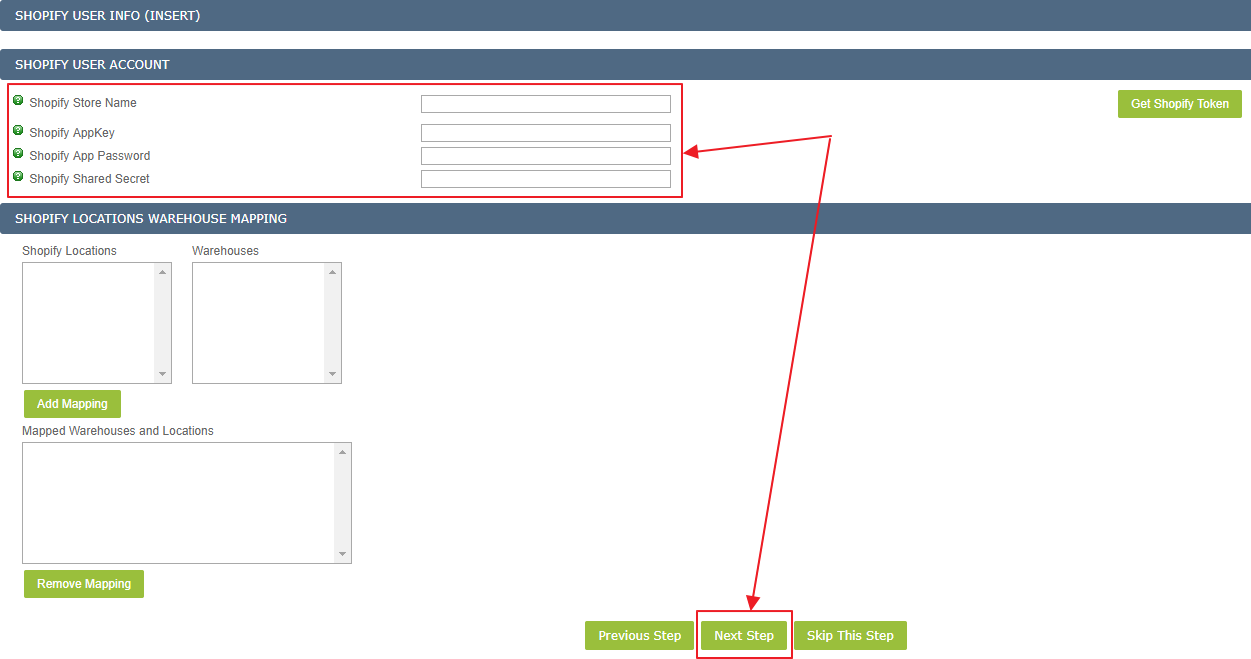
- Upon clicking Next Step, you will be taken to the Shopify User Info page, where you will fill in the Shopify credentials you had set up within your Shopify account on Step 3 and 4 of this walk-through.
- After providing information for your Shopify User Account in Kyozou, click Next Step. This will save Shopify as a subcategory on Step 11 of your Control Panel.
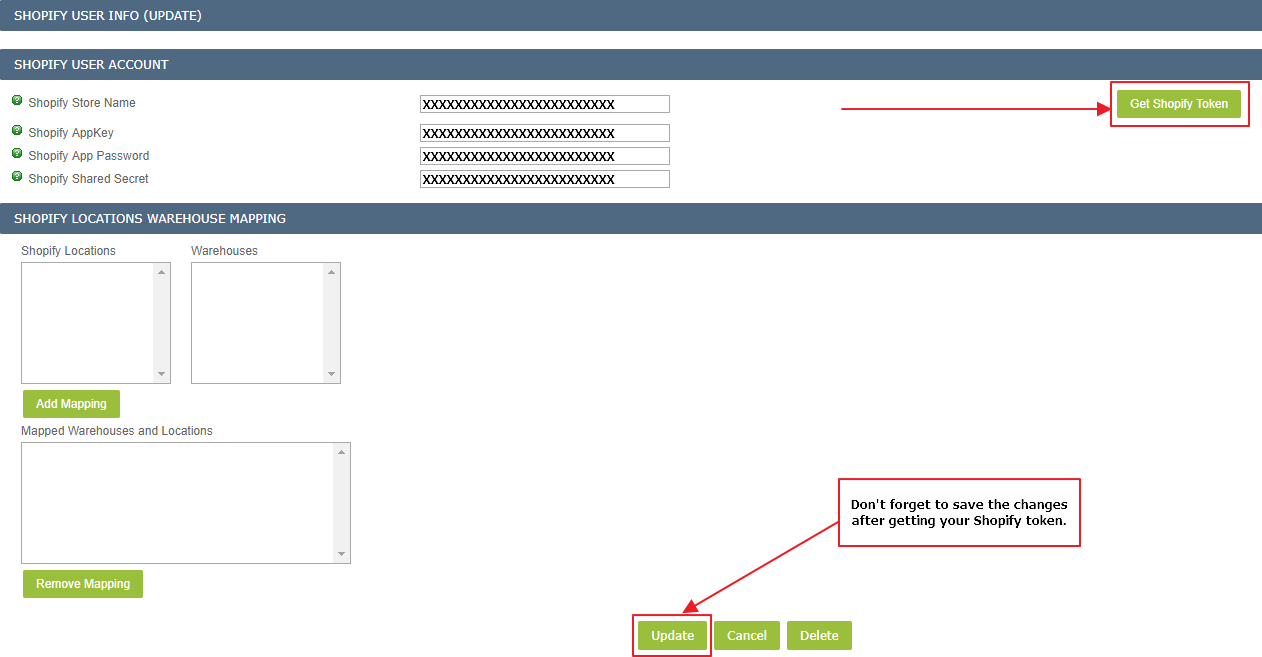
- Lastly, click on the new Shopify subcategory on Step 11 of your Control Panel. Click the Get Shopify Token button. You will get a pop-up screen where you will need to agree to terms of bridging your Shopify account with Kyozou.
Part Two – How to Create & List Products to Shopify
HOW TO CREATE A PRODUCT WITH SHOPIFY SETTINGS
- After adding your Shopify account into Kyozou, you will see a new section at the very bottom in the Product Details page.

- Unselect the “Do not list to Shopify” checkbox to reveal the Shopify listing options.

Override Title: Select this checkbox if you’d like to specify a different title for your Shopify Listings. Leaving this unchecked will use the default Title for the product.
Price: Input the price you’d like to set for this product on Shopify.
Tags: Tags control your website categories. Each tag needs to be separated with a comma. (Your website categories should already be present on Shopify to utilize this field.)
- Click “Save product(s)” to create or save your product.
HOW TO CREATE A PRODUCT WITH SHOPIFY SETTINGS VIA EXCEL
Here are the headers you will need to use to update the Shopify listings options for your products:
| ProductID | shopify_Title | shopify_Tags | shopify_SellerId | shopify_Price |
| 12345 | Shopify Test RC 6 | MJ23, Test1 | 1 | 10 |
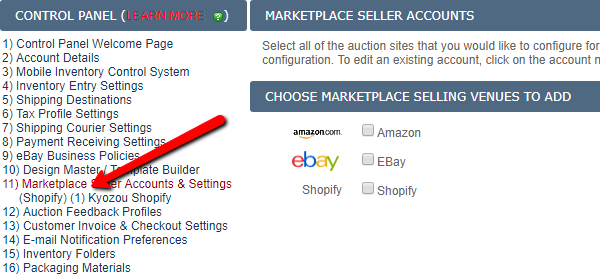 To find your Shopify SellerID head over to the Control Panel and click on “11) Marketplace Seller Accounts & Settings” and you’ll see a list of all your marketplaces appear below. The number you see in brackets next to your Shopify account is your SellerID.
HOW TO LIST A PRODUCT TO SHOPIFY
All products being listed to Shopify need to be done through the Multi-Lister.
- Navigate to Listings / Multi-lister / Launch New Listings
- Select the item you would like to list to Shopify/Multi-Lister and in the “For selected item(s)” dropdown menu, select “List to Multi-lister”

- You will be taken to a confirmation page where you can modify the quantity that you want to list to Shopify/Multi-lister. Once you set your quantity click “List To Multilister”
- Your item will launch to Shopify within 30 minutes.
HOW TO EDIT A SHOPIFY LISTING
- Navigate to Listings / Multi-Lister / Current Listings
- Set the “Selling Venues” Dropdown menu to “Shopify” and the “Listing Status” Dropdown menu to “Active” and click the “Search” button.
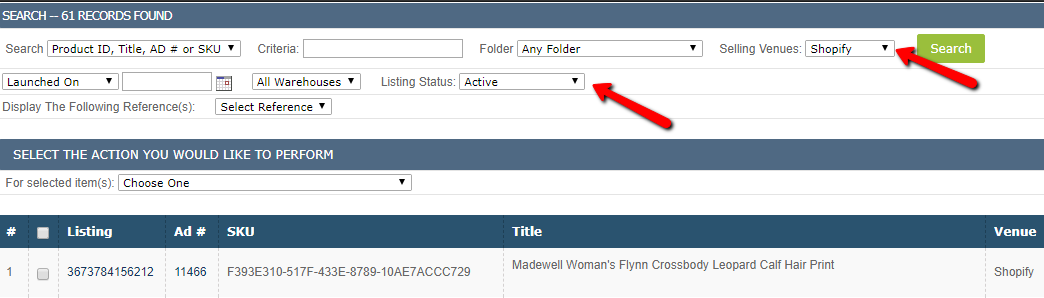
- Search for the item you would like to revise.
- Click on the checkbox and in the “For selected item(s)” Dropdown select the settings you’d like
to revise.

End Listing: This will end the listing on Shopify.
End Listing(s) & Remove Venue from Multi-Lister: This will remove the Shopify Venue from the Multi- Lister active listings page.
Revise Title, Description and Tags: This will revise the Shopify Title, Description and the Tags.
Revise Prices: This will revise the Shopify Price.